---
files: [app.py]
url: https://cdn.cs50.net/2022/fall/psets/9/finance/README.md
window: [terminal]
---
# C$50 Finance
Implement a website via which users can "buy" and "sell" stocks, a la the below.
## Background
If you're not quite sure what it means to buy and sell stocks (i.e., shares of a company), head [here](https://www.investopedia.com/articles/basics/06/invest1000.asp) for a tutorial.
You're about to implement C$50 Finance, a web app via which you can manage portfolios of stocks. Not only will this tool allow you to check real stocks' actual prices and portfolios' values, it will also let you buy (okay, "buy") and sell (okay, "sell") stocks by querying [IEX](https://iextrading.com/developer/) for stocks' prices.
Indeed, IEX lets you download stock quotes via their API (application programming interface) using URLs like `https://cloud-sse.iexapis.com/stable/stock/nflx/quote?token=API_KEY`. Notice how Netflix's symbol (NFLX) is embedded in this URL; that's how IEX knows whose data to return. That link won't actually return any data because IEX requires you to use an API key (more about that in a bit), but if it did, you'd see a response in JSON (JavaScript Object Notation) format like this:
```
{
"avgTotalVolume": 15918066,
"calculationPrice": "close",
"change": -8.27,
"changePercent": -0.03074,
"close": 260.79,
"closeSource": "official",
"closeTime": 1667592000924,
"companyName": "Netflix Inc.",
"currency": "USD",
"delayedPrice": 260.81,
"delayedPriceTime": 1667591988947,
"extendedChange": 0.21,
"extendedChangePercent": 0.00081,
"extendedPrice": 261,
"extendedPriceTime": 1667606392772,
"high": 274.97,
"highSource": "15 minute delayed price",
"highTime": 1667592000831,
"iexAskPrice": None,
"iexAskSize": None,
"iexBidPrice": None,
"iexBidSize": None,
"iexClose": 260.85,
"iexCloseTime": 1667591999754,
"iexLastUpdated": None,
"iexMarketPercent": None,
"iexOpen": 271.67,
"iexOpenTime": 1667568602197,
"iexRealtimePrice": None,
"iexRealtimeSize": None,
"iexVolume": None,
"lastTradeTime": 1667591999820,
"latestPrice": 260.79,
"latestSource": "Close",
"latestTime": "November 4, 2022",
"latestUpdate": 1667592000924,
"latestVolume": 11124694,
"low": 255.32,
"lowSource": "15 minute delayed price",
"lowTime": 1667584872696,
"marketCap": 115215720136,
"oddLotDelayedPrice": 260.81,
"oddLotDelayedPriceTime": 1667591988947,
"open": 271.9,
"openTime": 1667568601785,
"openSource": "official",
"peRatio": 23.39,
"previousClose": 269.06,
"previousVolume": 7057350,
"primaryExchange": "NASDAQ",
"symbol": "NFLX",
"volume": 11124694,
"week52High": 700.99,
"week52Low": 162.71,
"ytdChange": -0.5978504176349512,
"isUSMarketOpen": False
}
```
Notice how, between the curly braces, there's a comma-separated list of key-value pairs, with a colon separating each key from its value.
Let's turn our attention now to getting this problem's distribution code!
### Configuring
Before getting started on this assignment, we'll need to register for an API key in order to be able to query IEX's data. To do so, follow these steps:
* Visit [iexcloud.io/cloud-login#/register/](https://iexcloud.io/cloud-login#/register/).
* Select the "Individual" account type, then enter your name, email address, and a password, and click "Create account".
* Once registered, scroll down to âGet started for freeâ and click âSelect Start planâ to choose the free plan.
* Once you've confirmed your account via a confirmation email, visit [https://iexcloud.io/console/tokens](https://iexcloud.io/console/tokens).
* Copy the key that appears under the *Token* column (it should begin with `pk_`).
* In your terminal window, execute:
```
$ export API_KEY=value
```
where `value` is that (pasted) value, without any space immediately before or after the `=`. You also may wish to paste that value in a text document somewhere, in case you need it again later.
### Running
Start Flask's built-in web server (within `finance/`):
```
$ flask run
```
Visit the URL outputted by `flask` to see the distribution code in action. You won't be able to log in or register, though, just yet!
Within `finance/`, run `sqlite3 finance.db` to open `finance.db` with `sqlite3`. If you run `.schema` in the SQLite prompt, notice how `finance.db` comes with a table called `users`. Take a look at its structure (i.e., schema). Notice how, by default, new users will receive $10,000 in cash. But if you run `SELECT * FROM users;`, there aren't (yet!) any users (i.e., rows) therein to browse.
Another way to view `finance.db` is with a program called phpLiteAdmin. Click on `finance.db` in your codespace's file browser, then click the link shown underneath the text "Please visit the following link to authorize GitHub Preview". You should see information about the database itself, as well as a table, `users`, just like you saw in the `sqlite3` prompt with `.schema`.
### Understanding
#### `app.py`
Open up `app.py`. Atop the file are a bunch of imports, among them CS50's SQL module and a few helper functions. More on those soon.
After configuring [Flask](http://flask.pocoo.org/), notice how this file disables caching of responses (provided you're in debugging mode, which you are by default in your code50 codespace), lest you make a change to some file but your browser not notice. Notice next how it configures [Jinja](http://jinja.pocoo.org/) with a custom "filter," `usd`, a function (defined in `helpers.py`) that will make it easier to format values as US dollars (USD). It then further configures Flask to store [sessions](https://flask.palletsprojects.com/en/1.1.x/quickstart/#sessions) on the local filesystem (i.e., disk) as opposed to storing them inside of (digitally signed) cookies, which is Flask's default. The file then configures CS50's SQL module to use `finance.db`.
Thereafter are a whole bunch of routes, only two of which are fully implemented: `login` and `logout`. Read through the implementation of `login` first. Notice how it uses `db.execute` (from CS50's library) to query `finance.db`. And notice how it uses `check_password_hash` to compare hashes of users' passwords. Also notice how `login` "remembers" that a user is logged in by storing his or her `user_id`, an INTEGER, in `session`. That way, any of this file's routes can check which user, if any, is logged in. Finally, notice how once the user has successfully logged in, `login` will redirect to `"/"`, taking the user to their home page. Meanwhile, notice how `logout` simply clears `session`, effectively logging a user out.
Notice how most routes are "decorated" with `@login_required` (a function defined in `helpers.py` too). That decorator ensures that, if a user tries to visit any of those routes, he or she will first be redirected to `login` so as to log in.
Notice too how most routes support GET and POST. Even so, most of them (for now!) simply return an "apology," since they're not yet implemented.
#### `helpers.py`
Next take a look at `helpers.py`. Ah, there's the implementation of `apology`. Notice how it ultimately renders a template, `apology.html`. It also happens to define within itself another function, `escape`, that it simply uses to replace special characters in apologies. By defining `escape` inside of `apology`, we've scoped the former to the latter alone; no other functions will be able (or need) to call it.
Next in the file is `login_required`. No worries if this one's a bit cryptic, but if you've ever wondered how a function can return another function, here's an example!
Thereafter is `lookup`, a function that, given a `symbol` (e.g., NFLX), returns a stock quote for a company in the form of a `dict` with three keys: `name`, whose value is a `str`, the name of the company; `price`, whose value is a `float`; and `symbol`, whose value is a `str`, a canonicalized (uppercase) version of a stock's symbol, irrespective of how that symbol was capitalized when passed into `lookup`.
Last in the file is `usd`, a short function that simply formats a `float` as USD (e.g., `1234.56` is formatted as `$1,234.56`).
#### `requirements.txt`
Next take a quick look at `requirements.txt`. That file simply prescribes the packages on which this app will depend.
#### `static/`
Glance too at `static/`, inside of which is `styles.css`. That's where some initial CSS lives. You're welcome to alter it as you see fit.
#### `templates/`
Now look in `templates/`. In `login.html` is, essentially, just an HTML form, stylized with [Bootstrap](http://getbootstrap.com/). In `apology.html`, meanwhile, is a template for an apology. Recall that `apology` in `helpers.py` took two arguments: `message`, which was passed to `render_template` as the value of `bottom`, and, optionally, `code`, which was passed to `render_template` as the value of `top`. Notice in `apology.html` how those values are ultimately used! And [here's why](https://github.com/jacebrowning/memegen) 0:-)
Last up is `layout.html`. It's a bit bigger than usual, but that's mostly because it comes with a fancy, mobile-friendly "navbar" (navigation bar), also based on Bootstrap. Notice how it defines a block, `main`, inside of which templates (including `apology.html` and `login.html`) shall go. It also includes support for Flask's [message flashing](https://flask.palletsprojects.com/en/1.1.x/quickstart/#message-flashing) so that you can relay messages from one route to another for the user to see.
## Specification
### `register`
Complete the implementation of `register` in such a way that it allows a user to register for an account via a form.
* Require that a user input a username, implemented as a text field whose `name` is `username`. Render an apology if the user's input is blank or the username already exists.
* Require that a user input a password, implemented as a text field whose `name` is `password`, and then that same password again, implemented as a text field whose `name` is `confirmation`. Render an apology if either input is blank or the passwords do not match.
* Submit the user's input via `POST` to `/register`.
* `INSERT` the new user into `users`, storing a hash of the user's password, not the password itself. Hash the user's password with [`generate_password_hash`](https://werkzeug.palletsprojects.com/en/1.0.x/utils/#werkzeug.security.generate_password_hash) Odds are you'll want to create a new template (e.g., `register.html`) that's quite similar to `login.html`.
Once you've implemented `register` correctly, you should be able to register for an account and log in (since `login` and `logout` already work)! And you should be able to see your rows via phpLiteAdmin or `sqlite3`.
### `quote`
Complete the implementation of `quote` in such a way that it allows a user to look up a stock's current price.
* Require that a user input a stock's symbol, implemented as a text field whose `name` is `symbol`.
* Submit the user's input via `POST` to `/quote`.
* Odds are you'll want to create two new templates (e.g., `quote.html` and `quoted.html`). When a user visits `/quote` via GET, render one of those templates, inside of which should be an HTML form that submits to `/quote` via POST. In response to a POST, `quote` can render that second template, embedding within it one or more values from `lookup`.
### `buy`
Complete the implementation of `buy` in such a way that it enables a user to buy stocks.
* Require that a user input a stock's symbol, implemented as a text field whose `name` is `symbol`. Render an apology if the input is blank or the symbol does not exist (as per the return value of `lookup`).
* Require that a user input a number of shares, implemented as a text field whose `name` is `shares`. Render an apology if the input is not a positive integer.
* Submit the user's input via `POST` to `/buy`.
* Upon completion, redirect the user to the home page.
* Odds are you'll want to call `lookup` to look up a stock's current price.
* Odds are you'll want to `SELECT` how much cash the user currently has in `users`.
* Add one or more new tables to `finance.db` via which to keep track of the purchase. Store enough information so that you know who bought what at what price and when.
* Use appropriate SQLite types.
* Define `UNIQUE` indexes on any fields that should be unique.
* Define (non-`UNIQUE`) indexes on any fields via which you will search (as via `SELECT` with `WHERE`).
* Render an apology, without completing a purchase, if the user cannot afford the number of shares at the current price.
* You don't need to worry about race conditions (or use transactions).
Once you've implemented `buy` correctly, you should be able to see users' purchases in your new table(s) via phpLiteAdmin or `sqlite3`.
### `index`
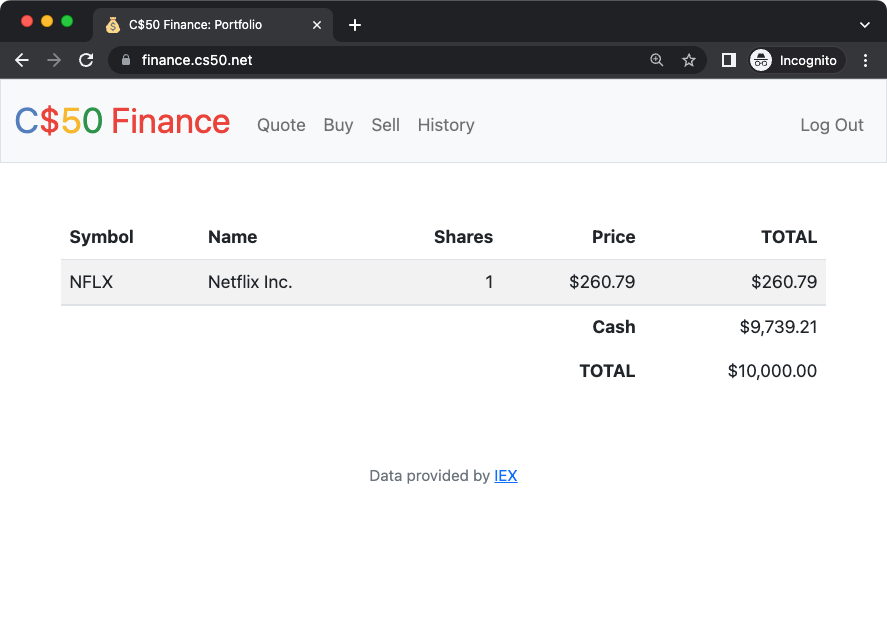
Complete the implementation of `index` in such a way that it displays an HTML table summarizing, for the user currently logged in, which stocks the user owns, the numbers of shares owned, the current price of each stock, and the total value of each holding (i.e., shares times price). Also display the user's current cash balance along with a grand total (i.e., stocks' total value plus cash).
* Odds are you'll want to execute multiple `SELECT`s. Depending on how you implement your table(s), you might find [GROUP BY](https://www.google.com/search?q=SQLite+GROUP+BY,) [HAVING](https://www.google.com/search?q=SQLite+HAVING,) [SUM](https://www.google.com/search?q=SQLite+SUM,) and/or [WHERE](https://www.google.com/search?q=SQLite+WHERE) of interest.
* Odds are you'll want to call `lookup` for each stock.
### `sell`
Complete the implementation of `sell` in such a way that it enables a user to sell shares of a stock (that he or she owns).
* Require that a user input a stock's symbol, implemented as a `select` menu whose `name` is `symbol`. Render an apology if the user fails to select a stock or if (somehow, once submitted) the user does not own any shares of that stock.
* Require that a user input a number of shares, implemented as a text field whose `name` is `shares`. Render an apology if the input is not a positive integer or if the user does not own that many shares of the stock.
* Submit the user's input via `POST` to `/sell`.
* Upon completion, redirect the user to the home page.
* You don't need to worry about race conditions (or use transactions).
### `history`
Complete the implementation of `history` in such a way that it displays an HTML table summarizing all of a user's transactions ever, listing row by row each and every buy and every sell.
* For each row, make clear whether a stock was bought or sold and include the stock's symbol, the (purchase or sale) price, the number of shares bought or sold, and the date and time at which the transaction occurred.
* You might need to alter the table you created for `buy` or supplement it with an additional table. Try to minimize redundancies.
### personal touch
Implement at least one personal touch of your choice:
* Allow users to change their passwords.
* Allow users to add additional cash to their account.
* Allow users to buy more shares or sell shares of stocks they already own via `index` itself, without having to type stocks' symbols manually.
* Require users' passwords to have some number of letters, numbers, and/or symbols.
* Implement some other feature of comparable scope.
Be sure to include a comment at the top of `app.py` to indicate to your Teaching Fellow what your personal touch is!
## Walkthrough
{% video https://www.youtube.com/watch?v=7wPTAwT-6bA %}
## Testing
Be sure to test your web app manually, as by
* registering a new user and verifying that their portfolio page loads with the correct information,
* requesting a quote using a valid stock symbol,
* purchasing one stock multiple times, verifying that the portfolio displays correct totals,
* selling all or some of a stock, again verifying the portfolio, and
* verifying that your history page shows all transactions for your logged in user.
Also test some unexpected usage, as by
* inputting alphabetical strings into forms when only numbers are expected,
* inputting zero or negative numbers into forms when only positive numbers are expected,
* inputting floating-point values into forms when only integers are expected,
* trying to spend more cash than a user has,
* trying to sell more shares than a user has,
* inputting an invalid stock symbol, and
* including potentially dangerous characters like `'` and `;` in SQL queries.
Once satisfied, to test your code with `check50`, execute the below.
```
$ check50 cs50/problems/2022/fall/finance
```
{% alert warning %}
Be aware that `check50` will test your entire program as a whole. If you run it **before** completing all required functions, it may report errors on functions that are actually correct but depend on other functions.
{% endalert %}
Execute the below to evaluate the style of your Python files using `style50`.
```
style50 *.py
```
## Staff's Solution
You're welcome to stylize your own app differently, but here's what the staff's solution looks like!
[https://finance.cs50.net/](https://finance.cs50.net/)
Feel free to register for an account and play around. Do **not** use a password that you use on other sites.
It is **reasonable** to look at the staff's HTML and CSS.
## Hints
* To format a value as a US dollar value (with cents listed to two decimal places), you can use the `usd` filter in your Jinja templates (printing values as `{% raw %}{{ value | usd }}{% endraw %}` instead of `{% raw %}{{ value }}{% endraw %}`.
* Within `cs50.SQL` is an `execute` method whose first argument should be a `str` of SQL. If that `str` contains question mark parameters to which values should be bound, those values can be provided as additional named parameters to `execute`. See the implementation of `login` for one such example. The return value of `execute` is as follows:
* If `str` is a `SELECT`, then `execute` returns a `list` of zero or more `dict` objects, inside of which are keys and values representing a table's fields and cells, respectively.
* If `str` is an `INSERT`, and the table into which data was inserted contains an autoincrementing `PRIMARY KEY`, then `execute` returns the value of the newly inserted row's primary key.
* If `str` is a `DELETE` or an `UPDATE`, then `execute` returns the number of rows deleted or updated by `str`.
* Recall that `cs50.SQL` will log to your terminal window any queries that you execute via `execute` (so that you can confirm whether they're as intended).
* Be sure to use question mark-bound parameters (i.e., a [paramstyle](https://www.python.org/dev/peps/pep-0249/#paramstyle) of `named`) when calling CS50's `execute` method, a la `WHERE ?`. Do **not** use f-strings, [`format`](https://docs.python.org/3.6/library/functions.html#format,) or `+` (i.e., concatenation), lest you risk a SQL injection attack.
* If (and only if) already comfortable with SQL, you're welcome to use [SQLAlchemy Core](http://docs.sqlalchemy.org/en/latest/index.html) or [Flask-SQLAlchemy](http://flask-sqlalchemy.pocoo.org/) (i.e., [SQLAlchemy ORM](http://docs.sqlalchemy.org/en/latest/index.html)) instead of `cs50.SQL`.
* You're welcome to add additional static files to `static/`.
* Odds are you'll want to consult [Jinja's documentation](https://jinja.palletsprojects.com/en/3.1.x/) when implementing your templates.
* It is **reasonable** to ask others to try out (and try to trigger errors in) your site.
* You're welcome to alter the aesthetics of the sites, as via
* ,
* ,
* , and/or
* .
* You may find [Flask's documentation](https://flask.palletsprojects.com/en/1.1.x/quickstart/) and [Jinja's documentation](https://jinja.palletsprojects.com/en/2.11.x/templates/) helpful!
## FAQs
### ImportError: No module named 'application'
By default, `flask` looks for a file called `app.py` in your current working directory (because we've configured the value of `FLASK_APP`, an environment variable, to be `app.py`). If seeing this error, odds are you've run `flask` in the wrong directory!
### OSError: [Errno 98] Address already in use
If, upon running `flask`, you see this error, odds are you (still) have `flask` running in another tab. Be sure to kill that other process, as with ctrl-c, before starting `flask` again. If you haven't any such other tab, execute `fuser -k 8080/tcp` to kill any processes that are (still) listening on TCP port 8080.
## How to Submit
1. While in your `finance` directory, create a ZIP file of your website by executing:
```
zip -r finance.zip *
```
1. Download your `finance.zip` file by control-clicking or right-clicking on the file in your codespace's file browser and choosing **Download**.
2. Go to CS50's [Gradescope page](https://www.gradescope.com/).
3. Click "Problem Set 9: Finance".
4. Drag and drop your `finance.zip` file to the area that says "Drag & Drop". Be sure it has that **exact** filename! If you upload a file with a different name, the autograder likely will fail when trying to run it, and ensuring you have uploaded files with the correct filename is your responsibility!
5. Click "Upload".
You should see a message that says "Problem Set 9: Finance submitted successfully!"
{% alert danger %}
Per Step 4 above, after you submit, be sure to check your autograder results. If you see `SUBMISSION ERROR: missing files (0.0/1.0)`, it means your file was not named exactly as prescribed (or you uploaded it to the wrong problem).
Correctness in submissions entails everything from reading the specification, writing code that is compliant with it, and submitting files with the correct name. If you see this error, you should resubmit right away, making sure your submission is fully compliant with the specification. The staff will not adjust your filenames for you after the fact!
{% endalert %}